
Simplify your PPC strategy by automating tasks to save time and focus on making impactful decisions. Managing PPC campaigns can be time-consuming, especially when dealing with unnecessary elements or overlooking helpful tools.
In this article we’re going to share 7 shortcuts and features in Google Ads that can help you reclaim valuable time.
#1 Removing Duplicated Keywords
As accounts evolve or change hands, it’s common to lose track of which keywords are being targeted. This can happen when different managers structure campaigns differently over time.
Manually sorting through all the keywords to find duplicates can be a time-consuming task. Thankfully, Google Ads Editor offers a helpful solution.
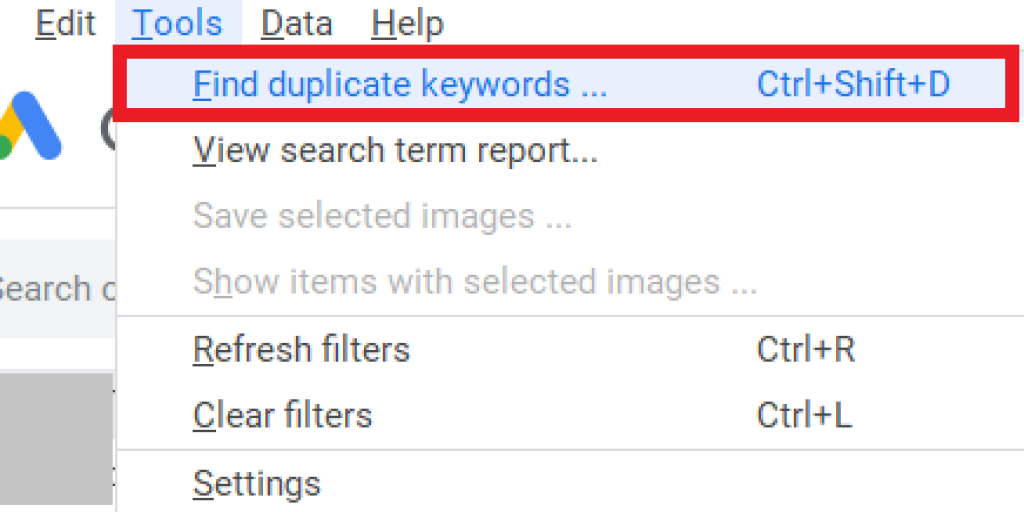
You can find the duplicate keywords tool under Tools in the top menu. This tool provides various options to define duplicate keywords according to your needs. For instance, you can choose between strict word order or any word order.
If you’re primarily concerned with Exact Match keywords, opting for strict word order may be best. On the other hand, selecting any word order can help identify duplicates in broad match searches or phrases with the same words in a different sequence.
Another useful option is the Location of duplicates setting. For instance, if you have campaigns targeting different devices or regions, you might want to check for duplicates within each campaign separately.
#2 Using Negative Keywords Lists
Speaking of keywords, let’s talk about a feature that helps organize negative keywords in your account.
Negative keyword lists are handy for excluding specific categories of keywords across multiple campaigns or the entire account. However, manually managing negative keywords over time can be tedious.
To streamline this process, Google Ads offers negative keyword lists. You can access this feature by navigating to Tools >> Shared Library >> Negative keyword lists in the online interface.

For instance, suppose you have a long list of irrelevant keywords that you want to exclude from all campaigns. You can create an “Irrelevant Keywords” list and apply it to every campaign in your account.
Another useful application is to separate branded terms from non-branded terms. By creating a negative keyword list for branded terms and applying it to non-brand campaigns, you prevent any overlap between brand and non-brand performance.
#3 Manage Ad Creatives With Labels
The Label function in Google Ads is a real game-changer when it comes to organizing your account and saving time.
In my opinion, it’s one of Google Ads’ most underrated features.
You can add labels to campaigns, ad groups, and keywords, but where they really shine is in managing time-sensitive tasks or routine testing. Labels make it easy to quickly turn things on or off, especially for ad copy that needs to be updated frequently.
One great feature is using labels for comparing different messaging or analyzing the results of copy tests. By labeling each ad, you can easily track performance and make informed decisions.
To view labeled ads, simply go to Reports > Pre-defined Reports and select the option for Labels. From there, you can see all the labeled groups and apply the metrics you want to analyze.
Another useful way to use labels is for scheduling. Once you’ve labeled the ads, you can select the ones you want to activate at a specific date and time. Just check the box next to the ads, then go to the blue toolbar and click on Edit.
From this point, you can set up rules for all the selected ads based on various timing and condition parameters.
You’ll need to repeat this step each time you want something to be turned off or on.
#4 Test Campaign Elements Fast With Experiments
When it comes to streamlining ad creation and testing, the Experiments feature comes in handy.
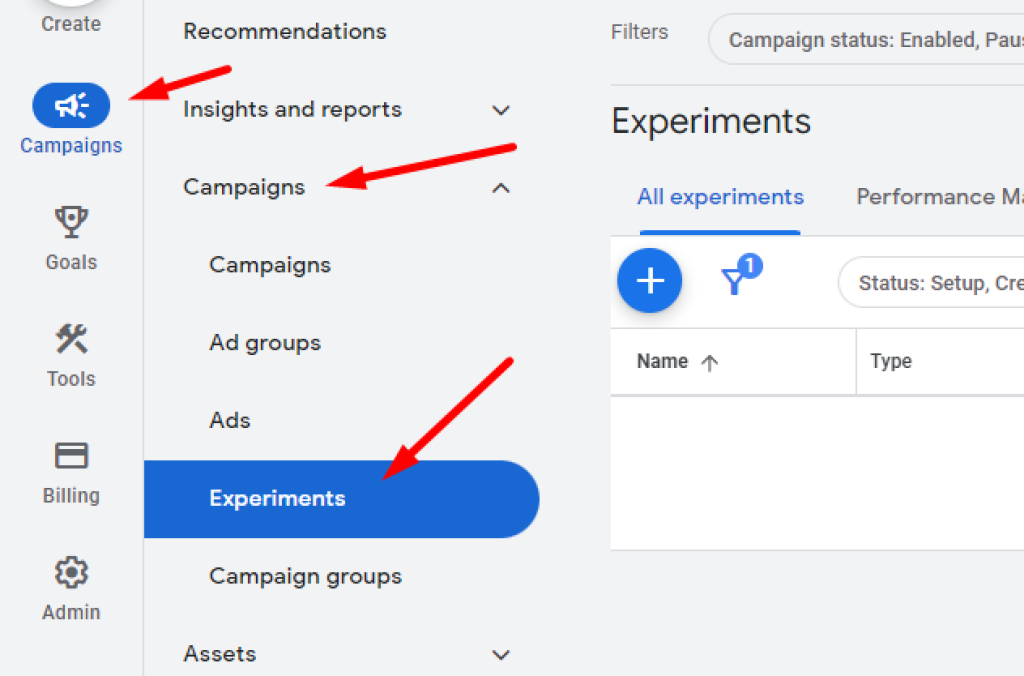
To access it, head over to the Experiments section, located in the toolbar next to your main pane. Click on “All experiments,” then hit the blue “+” button to create a new custom experiment.
From there, you’ll have several options to choose from:
- Performance Max experiment
- Demand Gen experiment
- Video experiment
- App uplift experiment (beta)
- Custom experiment
- Optimize text ads
One great aspect of this feature is the ability to set the percentage split of your audience. Unlike regular ad testing where Google auto-optimizes, here you can force a 50/50 split, giving you more control over your testing process.
#5 Use Notations
Keeping track of an account’s history in Google Ads can be quite challenging. With numerous variables at play, including external factors and multiple account managers, analyzing performance can become complicated.
For instance, when comparing year-over-year data, you might notice significant differences in performance. But why did this happen? It could be due to various reasons like holidays falling on different dates each year or unexpected PR boosts generating increased attention and searches.
To streamline this process and save time, you can utilize the Notes feature. Here’s how to add Notes:
- Click on the performance graph in either the Campaign or Ad Group view.
- Hover over the graph line to see the date and performance metrics.
- Look for the blue “Add Note” option and click on it.
- Type in your note and save it.
Once added, these notes will appear as small squares along the dateline of the graph, allowing you to keep track of significant events or changes over time.
#6 Add Audiences In Observation Mode
One often overlooked feature in Google Ads is the ability to add audiences to campaigns. But why is this so important?
Google’s approach to understanding user search intent and context has evolved beyond simply displaying ads for exact search term matches. This means that what was once primarily used for upper funnel campaigns, like Display and YouTube audiences, can now be incorporated into Search campaigns as well.
Before diving headfirst into narrowing down your campaigns to specific audiences, it’s wise to start by adding different audience signals in “Observation Mode” to your campaigns. This allows Google to collect data on how these audience segments perform within a campaign compared to those who are not part of those segments.
If you’re in the phase of gathering information, this approach is a no-brainer for efficiently gaining insights into who is interacting with your ads. Audiences can be added at either the campaign or ad group level. Here’s how:
- Navigate to the specified campaign or ad group.
- Choose “Audiences” from the left-hand menu.
- Click on “Edit audience segments” to access a variety of audience options, including detailed demographics, affinity, in-market, and your data segments.
- Select the audience segments that align with your campaign goals and add them as “Observation” to ensure you’re not narrowing your targeting too quickly.
Google provides a breakdown of key metrics, including conversion metrics, making it easy for you to assess how likely those audience segments are to purchase compared to users not identified as part of those audiences.
#7 Use Recommendations and Insights
Lastly, let’s talk about the Insights and Recommendations tabs in Google Ads.
These tabs are like having a personal assistant that highlights key changes in performance over different time periods, whether it’s week-over-week or month-over-month.
We’re all busy, and it’s easy to miss important insights when we’re deeply entrenched in our accounts day in and day out.
The Insights tab, located on the left-hand menu, offers valuable insights from the account level down to individual campaigns. It delves into various aspects of a campaign, such as search term insights or audience insights. Knowing where to direct your focus based on these insights can save a lot of time and help you tackle issues more efficiently.
Moving on to the Recommendations tab, also found on the left-hand menu, this is where you’ll find a plethora of recommendations tailored to your account. Here, you’ll also see your account’s “Optimization Score,” which reflects how well your account is optimized based on Google’s recommendations.
While it’s tempting to apply every recommendation just to boost your Optimization Score, I advise against it. Instead, take a closer look at the recommendations in the context of your account and apply those that make sense for your goals. These recommendations are typically categorized into areas such as repairs, bidding and budgets, keywords and targeting, ads and assets, and automated campaigns.
Conclusion
One big takeaway from these tips?
Automation.
Google Ads can be a labyrinth of complexity, and managing it all can devour precious time.
Administrative tasks, in particular, can steal hours that could be better invested in strategy and making smart PPC decisions.
That’s where Google’s tools come in handy.
Experiment with its automated bidding features, pay attention to the insights and recommendations it offers, and invest some initial time in setting up systems that streamline ongoing management.
In the long run, it’ll pay off by freeing you up to focus on what really matters: optimizing your campaigns for success.